Here's a collection of past photos of the route - before it became the Two Tunnels Shared Path. In some cases, these are from private collections, and we're grateful for the permissions of their owners to display them here. Some of the following images are clickable, some less so.
You're welcome to have a look at the Two Tunnels Flickr group - and use it to upload your own photos of the route for everyone to view.
 Bellotts Road bridge over the Great Western Main Line - circa 2007.
 Green Park Station circa 1910 - the entire station staff gather for some occasion unknown ...
© John Yeo
 This viaduct, brick arches with steel spans across the Lower Bristol Road, was one of the first major structures on the line to be demolished in 1968, making way for 'Road improvements'.
  You may locate its site to this day, as the public house still survives as the 'Royal Oak on what has become a busy traffic junction, while the very base of an arch also survives at the start of the Linear Way - the start of our path. Some called this 'Red bridge, Twerton'. The second image allows you to compare the bridge image with the site in the present day.
© John Yeo
 Alongside Bellotts Road or Hayters accommodation bridge, a three arched bridge carried the Somerset and Dorset Railway over the Great Western Main Line. The centre arch of this bridge was removed at Christmas 2015 for replacement by an arch with greater clearance - this to allow electrification of the present-day railway through Bath.
 These two photographs show the two remaining arches, supported by concrete infill, with the piers of the bridge awaiting further work to reinstate the arch.
 1973, and just north of the surviving bridge over the GW main line. A digger works to lower the trackbed. In the foreground may possibly be the remains of the structure that took the current footpath crossing of Linear Park beneath the S&D, though the sapling there may indicate otherwise. Above it, perhaps a fragment of the pipe that delivered water from the spring in Devonshire Tunnel to the loco works at Green Park.
© Mr T. J. Poole
 South of the S&D bridge crossing the GW main line, around 1973, an earthmover works to refashion some of the S&D's one in fifty.
© Mr T. J. Poole
 Another earthmover close to the cutting leading through to Dartmouth Avenue bridge. The new housing in the background is a reminder of how easy it would have been to lose this stretch to either housing or a new road, in the event it was the latter that was on the cards for a time. On the left, railway fencing survives as well as a narrow access footpath for the back gardens there.
© Mr T. J. Poole
 Two photos dating from the creation of Linear Park from the old line, seven years after it closed as a through route in 1973. Bath City Council's budget for this work was around £41,000, after they bought the land from the railways for a nominal sum believed to be £3.00. These date from the end of March, apparently with typical March weather.
The location is very recognisable today - though the rail bridge is gone and tree growth obscures the route of the line, the majority of the surrounding buildings survive.
 Claude Avenue bridge can be seen in the background of this image.
© Mr T. J. Poole
 A glimpse of a vanished part of Oldfield Park. The railway threw off sidings to this industrial site. The Somerset and Dorset main line can be seen climbing behind the brickworks - this is the same stretch of line as in the previous image and it's by no means clear if Dartmouth Avenue Bridge existed at this time. This image is part of the extensive Bath in Time collection and is reproduced here by kind permission.
The Victoria Brickworks in Oldfield Park is long gone - the clay pits, filled, are now public open space, while the site of the larger kiln is now covered by housing. The site of the smaller kiln is now occupied by Linear Way Industries - backed by a striking crescent of poplar trees visible from a large part of Bath and housing various services run by the local authority.
It's recently been announced that Bath Spa University is in negotiations to move various fine art teaching activities to the site - opening another chapter in its history - alongside the one time railway and emerging sustainable transport route, the Two Tunnels Greenway.
 A photograph taken before 1973 of the empty trackbed of the Somerset and Dorset Railway at Claude Avenue bridge. This is the point at which, many years previously, a locomotive finally derailed at some speed after running away at Midsomer Norton many miles to the south. Looking up slope you'll see that the trackbed has a horizon - the steady climb was interrupted by a flatter section where a siding was later constructed for Oldfield Park's Coop bakery - which received coal by rail for the entire life of the line. Few other photos of the line give such a clear impression of the way it ramped up the hillside through Oldfield Park. Indeed, surprisingly few photos exist of this section.
After it was closed as a through route, trains continued to climb past this spot to the bakery - the very last paying traffic over the northern end of the route. It was one of those that attracted the attention of the 5 year old son of a work colleague, causing him first to run and then to trip and catch his head on a lamp post close to the bridge, causing a lifelong aversion to trains if not lamp posts. (© John Rawlings)
 Not far up the slope from this bridge, old maps show a second underbridge beneath the line. The remains of this survive, buried, beneath the present day Linear Park.
 The straight approach to Devonshire Tunnel, much photographed from Maple Grove bridge in the far distance, but views from the foot of this section of Bath Bank are rare. The 1 in 50 climb from Bath Junction was broken by a short level section behind the photographer, but here the climb restarted with a vengeance, first at 1 in 66, steepening to 1 in 50, though south of Hiscocks bridge there seems to have been a short section that was steeper still.
On the extreme left, St Alphege's church.
© Robert Coles
 Believed to be 1976, this is certainly recession-torn Britain. In Radstock, a mile or so of the Somerset and Dorset is still in desultory use by British Rail, while an infant preservation scheme also struggles to survive, but trains are now only a memory on the descent into Bath. This shows the straight between the site of the demolished Monksdale Road bridge and Maple Road bridge, which can be seen in the background with the part-filled cutting and the site of Devonshire Tunnel beyond. The appearance of the embankment here shows that the first few feet of it were removed, much of the material placed in the cutting in the distance. Ten children and their teacher plant wildflower seeds in some rather stony ground. The teacher's clothes would nowadays be sought after by the Musum of Costume. A younger Haydn Jones wears a white jacket, at the left of the image. The teachers name is thought to be Mr Moon, while partly out of the photograph on the left is Robert Bland. Can anyone name the others?
(Image believed to be one of a series taken for the Evening Chronicle
 75007 leaves Devonshire's famously restricted bore. As if to emphasise the diminutive size of the tunnel, the portal was suitably understated as well. The Two Tunnels Path would see the portal exhumed from beneath the material that partly fills the cutting here. The portal itself, buried, sits behind a concrete barrier that keeps the fill from the tunnel itself.
© John Yeo
 Three views of the newly abandoned tunnel.
© Robert Coles
 In a few years the tunnel portal would be buried beneath material removed from the embankment to the north.
© Robert Coles
 The S&D track, still in place, leads the eye down Bath Bank, climbed by ninety years of assorted steam locos - and just a few times descended rather more rapidly by a runaway.
The tunnel drainage has been blocked, and the copious spring that was once piped down to the engine sheds has no difficulty in covering the sleepers before finding its way back into its pipe once more. After the track was lifted, this same spring would break out beneath Claude Avenue bridge, providing a fountain for children playing, all through one long hot summer. When the tunnel was blocked, the drain was repaired, the tunnel is now dry at this point.
This image contains a puzzle. The gradient diagram for the line marked this stretch as a climb of 1 in 50. However, beneath Maple Grove Bridge, there's a distinct change in gradient. Maybe the 1 in 50 climb through Devonshire was a bit shallower. Or perhaps Bath Bank was actually a bit steeper at one point. All this is easiest to see at the scan's original size.
© Robert Coles
 Maple Avenue bridge stands in the middle distance with a group of figures at what would have been a favourite haunt of railway photographers - in this image, the length of trackbed between bridge and tunnel entrance is curiously foreshortened by the camera lens. As the line receded into history the trackbed became more overgrown, until the work to Linear Park in 1973 remodelled this section, and the portal was sealed and buried. Until then the entire route including the tunnel had been simply left to nature and used as an informal path and playground. (© John Rawlings)
 The south portal of Devonshire Tunnel on a sleepy afternoon in summer 1938. Oxeye daisies grow in the railway embankment, tufts of grass appear to soften the ballast shoulder alongside the track.
© John Rawlings
 A freight train, banked by a second loco at the rear, leaves Devonshire Tunnel and climbs through Lyncombe Vale shortly before the summit of the route.
© John Yeo
 View northwards to Devonshire Tunnel's portal, steam courtesy of 9F 92224. Watery Bottom Viaduct is almost invisible in the mid-ground, the photographer was standing approximately where the current access path joins the trackbed.
© John Yeo
 Passage through Lyncombe Vale could result in local modification of the weather conditions ... here 48702 is doing just that ...
© John Yeo
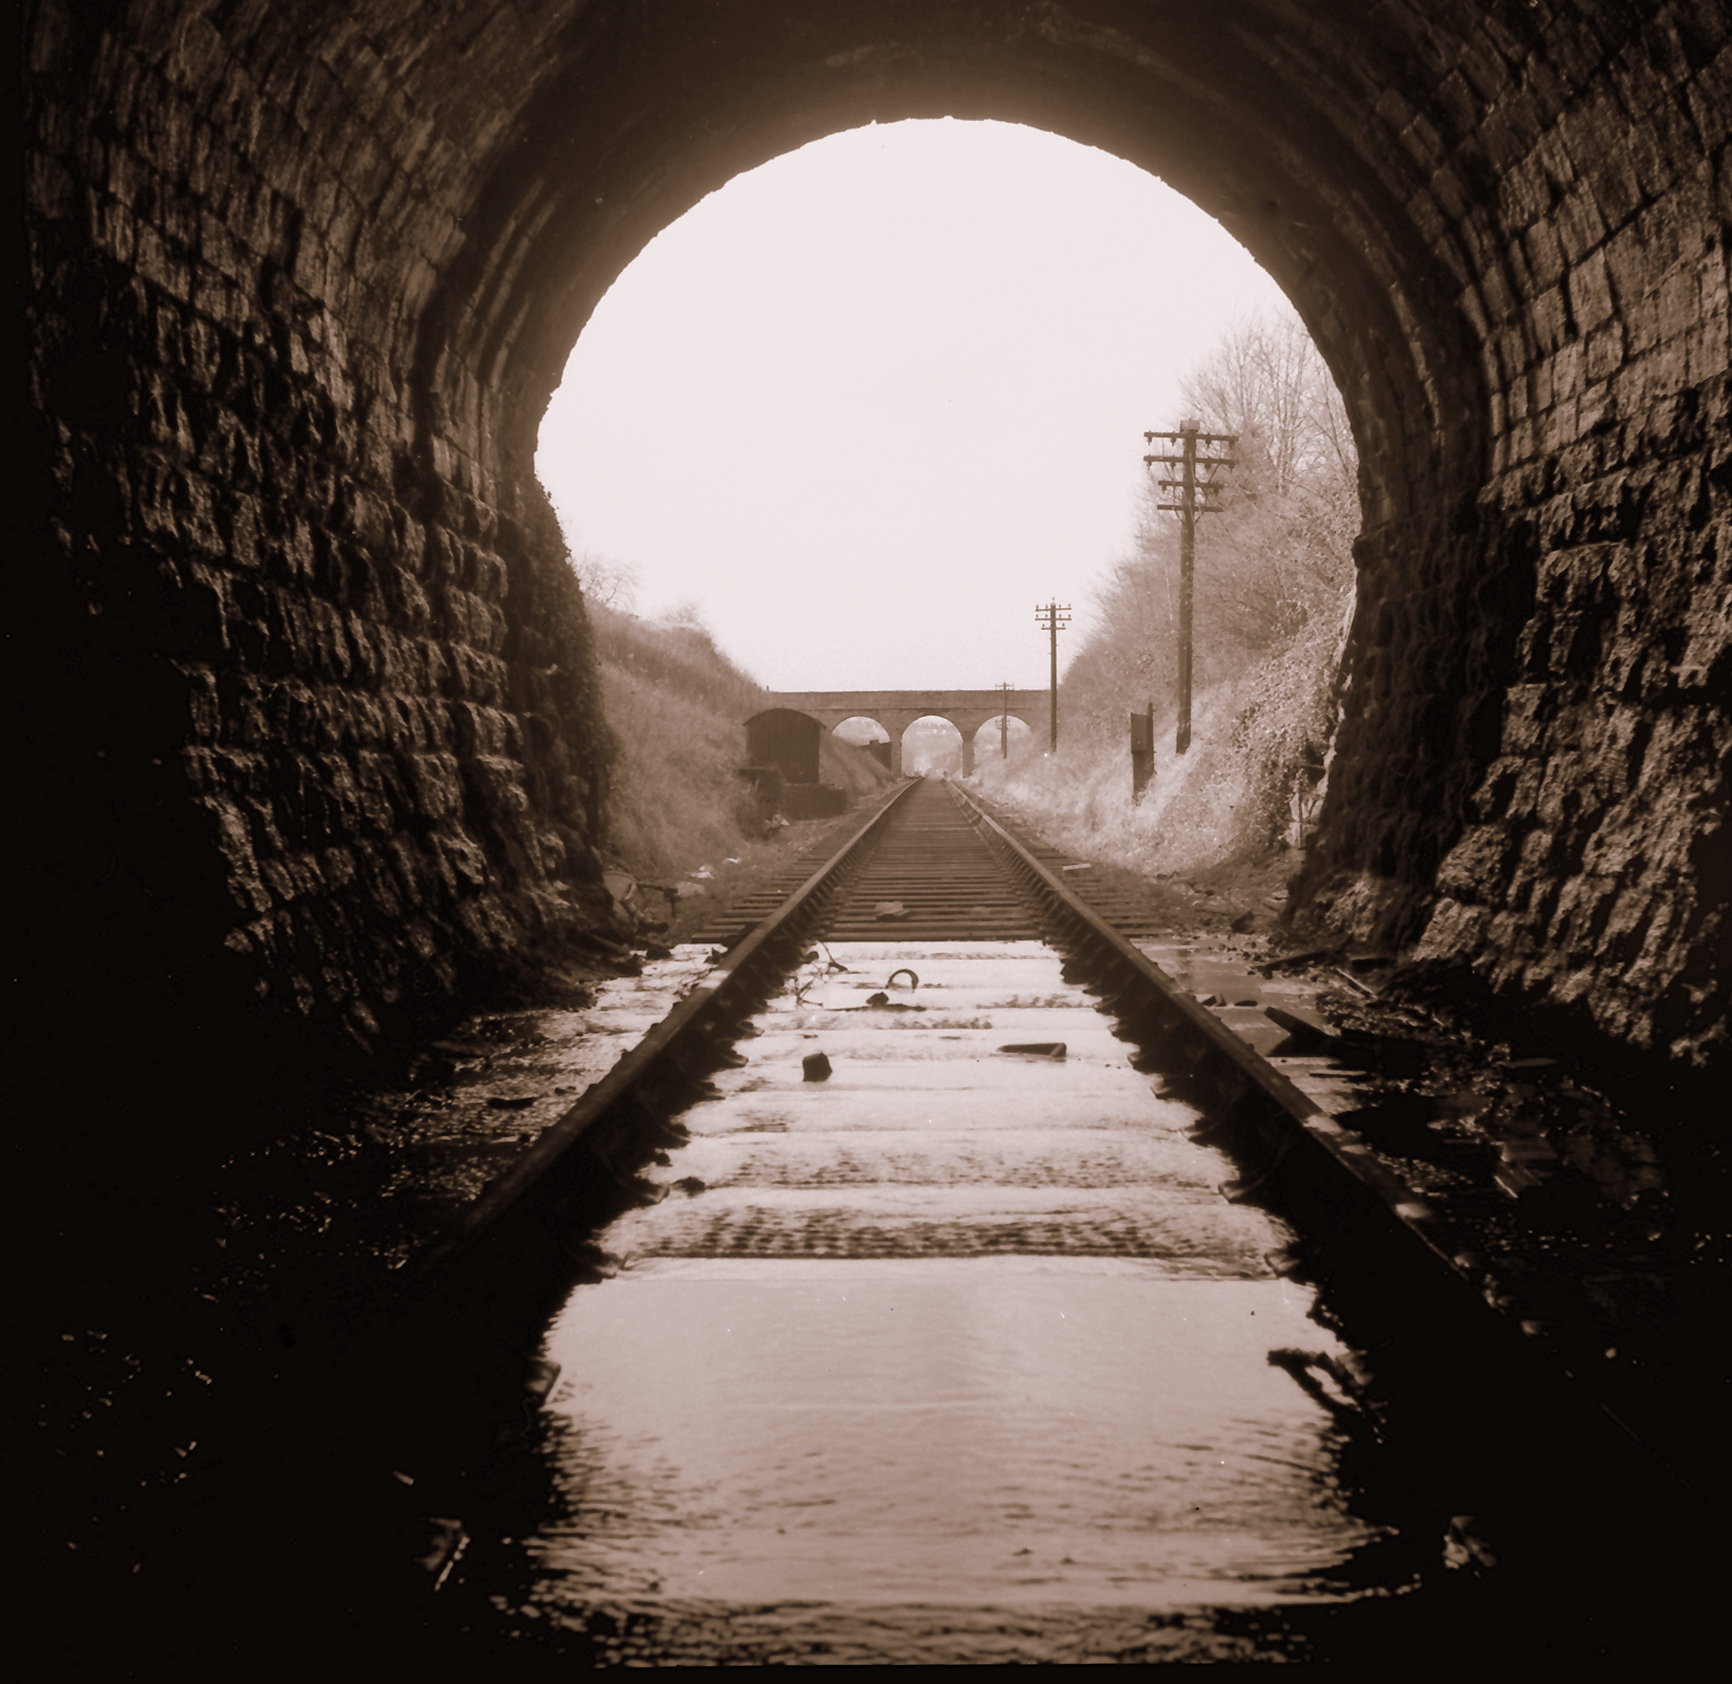
 The Somerset and Dorset during WW2. Combe Down Tunnel from the unusual vantage point of a house on Greenway Lane. Select the image for a larger version.
 An unlikely location for a line that carried trains from northern cities to the south coast. The line's summit on the climb out of Bath. No trains, and no smoke at the tunnel mouth, perhaps this is a Sunday. Deep in the cutting, the immaculate trackbed, maintained in those days by hand.
© John Rawlings
 Photos of the interior of Combe Down Tunnel from Graeme Bickerdyke (Link to 'Forgotten Relics' article) (also see Graeme's images from 27th June 2009 open day.)
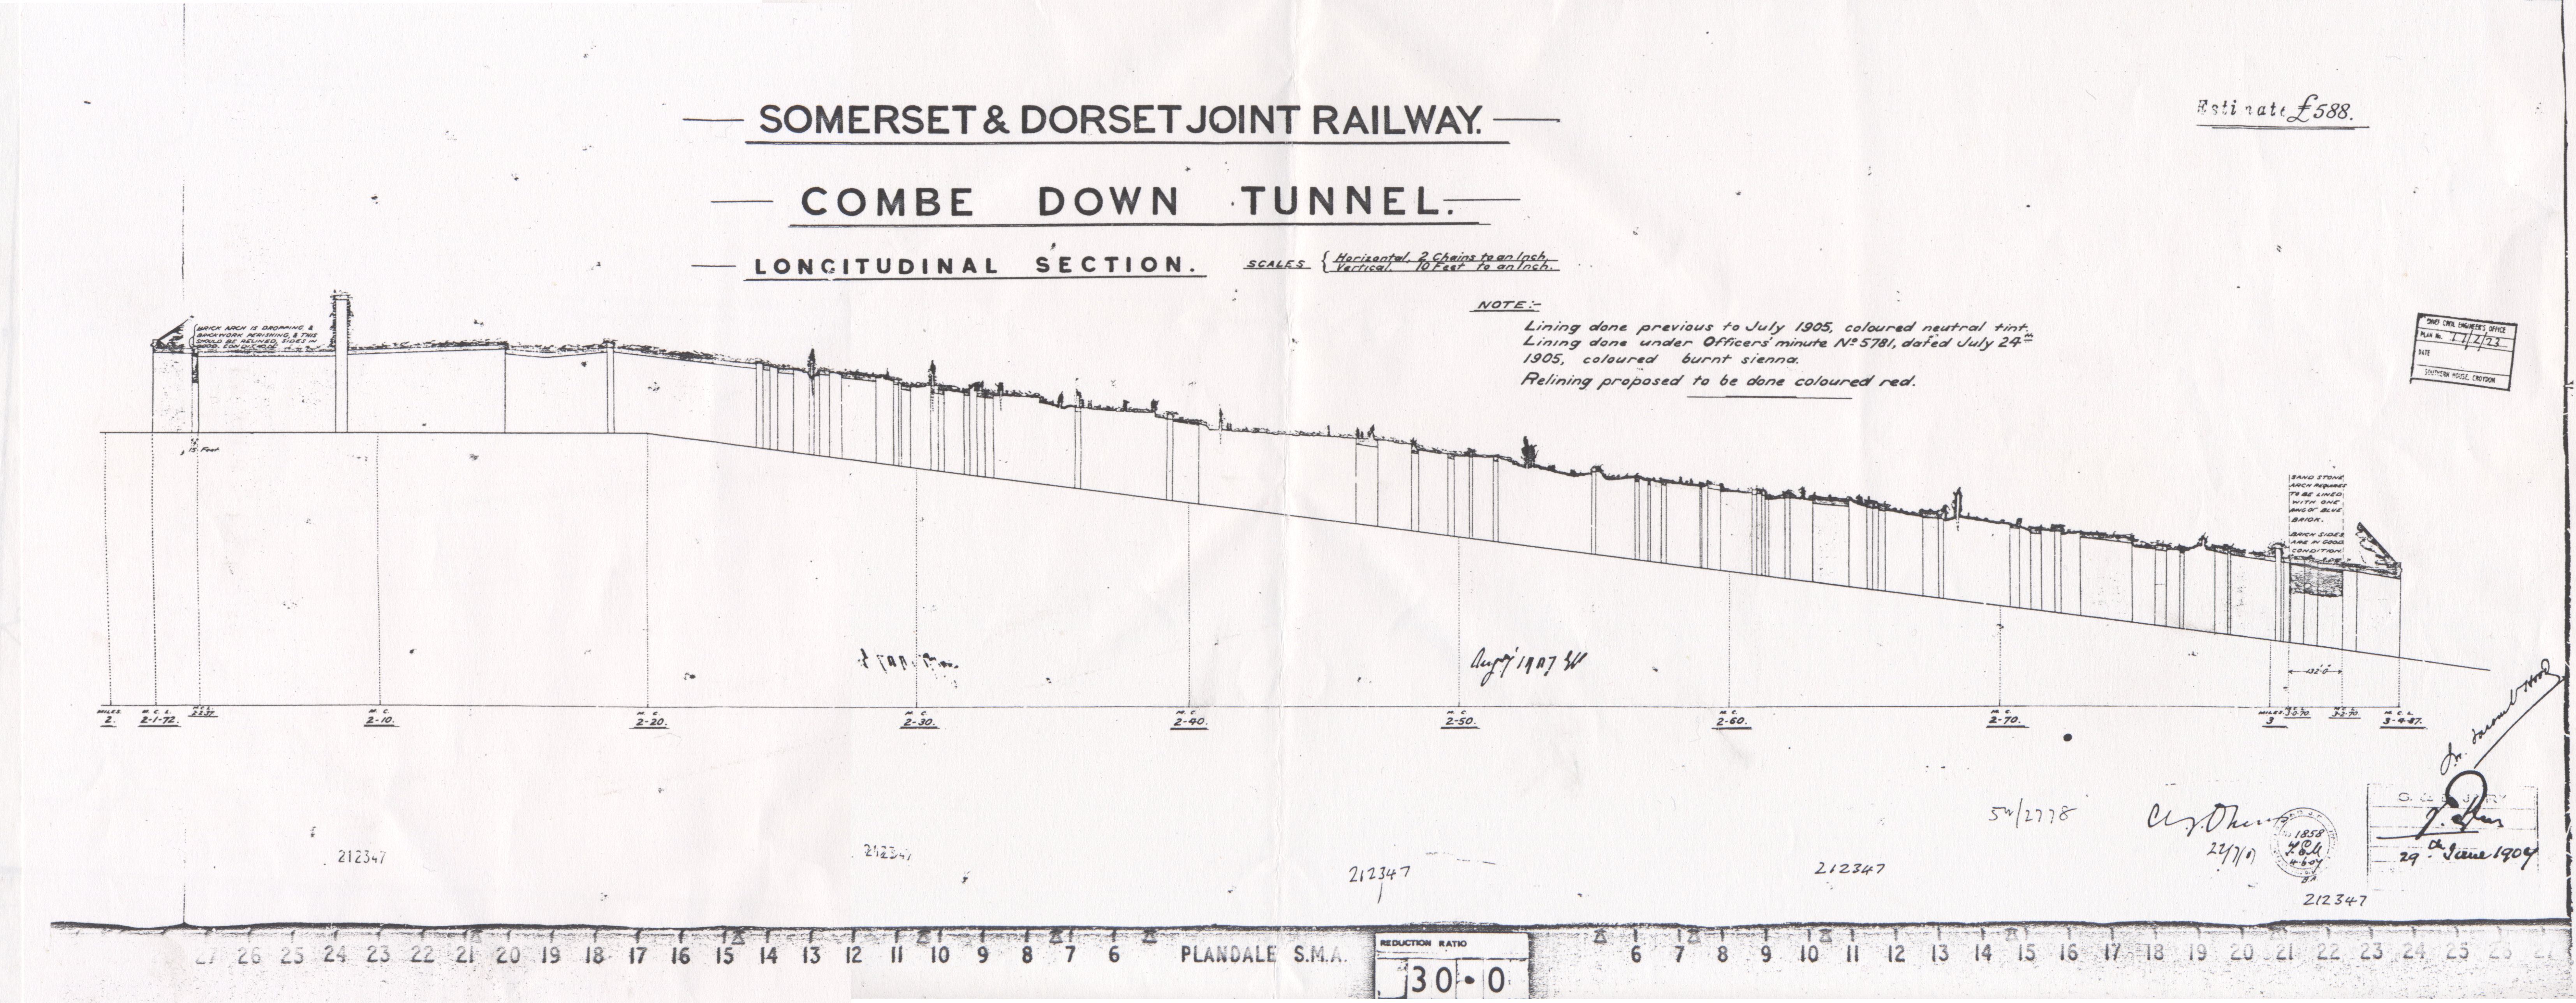
 A scanned A3 photocopy of a copy of an annotated plan of the tunnel from 1907-9, this records minor additional relining works consequent to some more substantial strengthening earlier in the tunnel's history. This is drawing number d10806 from the archive of the Somerset and Dorset Railway Trust, reproduced here by kind permission. The S&DRT maintains a working museum and prescence at Washford on the West Somerset Railway.
The tunnel today is in very good condition with very little structural work in almost a century - an indicator that it is stable and the likelihood that maintenance will be a drain on resources is low. Here's a scan of an engineering drawing of Combe Down Tunnel, courtesy of the S&DRT
 This image has kindly been provided by the Bath In Time
 ![]() web site and can there be viewed in more detail,
web site and can there be viewed in more detail, ![]() and copies purchased. An early glimpse of Combe Down Tunnel's south portal as built. This shows the ambitious cutting sides before they received a set of retaining arches built to hold back the rather weak Midford Sand through which the southernmost part of the tunnel passes. The southernmost length of Combe Down tunnel is brick lined in recognition of the ground through which it passes - much of the rest is completely unlined as it passes through the soft but self-supporting inferior oolite rock.
and copies purchased. An early glimpse of Combe Down Tunnel's south portal as built. This shows the ambitious cutting sides before they received a set of retaining arches built to hold back the rather weak Midford Sand through which the southernmost part of the tunnel passes. The southernmost length of Combe Down tunnel is brick lined in recognition of the ground through which it passes - much of the rest is completely unlined as it passes through the soft but self-supporting inferior oolite rock.
 75073 regains the afternoon sun on a high summer's day ...
© John Yeo
 Combe Down Tunnel's southern approach in 1970, the trackbed in use as an informal path from Wellow to Midford, then across the viaduct and through the tunnel.
 Looking south over the deck of the structure in 1903. This image and the following one date from the completion of work to double the structure. The line was largely built single track, and the expense involved in doubling the approaches to Bath meant that this work was destined not to be completed. This image displays an optical illusion - the abutment on the left appears to recede compared to the right hand abutment - this is connected with the additional depth of the right hand abutment, the embankment's fill not having been quite made up to level.
(Image by permission of BRB(Residuary) Ltd and kindly sourced by the S&DRHT
 The line's premier train, 1939, running south across the widened viaduct.
© John Rawlings
 A view of the southern viaduct approach. The existing wall has received a new security fence. Behind this, work has been carried out to clear the viaduct deck of the trees that if left would condemn the structure. We're embarrassed to say that though we've been campaigning for this, we don't know who carried out the work, but this has presumably been Wessex Water.
 Looking north along the viaduct deck, the camera struggles with the light levels, but the deck is seen to be clear of trees, revealing the original ballast for the single line on the east side of the structure.
 The viaduct again, the upstream side. Though the deck's been cleared of growth, still to be tackled are various trees and ivy lodged in the brick cladding.
 Midford Castle from the route of the line, now a footpath running across the slope beneath this small country house.
 The newly abandoned line south of Tucking Mill Viaduct - one of a series of images from Charles Henderson -now available from the Bath in Time
 ![]() web site. (Here's a direct link to 'Bath in Time' Henderson image set)
web site. (Here's a direct link to 'Bath in Time' Henderson image set) ![]() .
.
 Post 1966, and the site of Midford's goods yard slumbers beside the abandoned Somerset and Dorset Main Line. This second image from Charles Henderson's collection shows the start of what will be the Two Tunnels route. Now available from the Bath in Time
 ![]() web site. (Again, a direct link to 'Bath in Time' Henderson image set
web site. (Again, a direct link to 'Bath in Time' Henderson image set ![]()
 This shows you why it seems so much easier to cycle from Wellow to Midford rather than Midford to Wellow ... As for the route out of Bath, one-in-fifty is an easier climb on foot or cycle than it is for a steam loco, and the summit of the climb, at 61 metres or so, is considerably lower than Combe Down itself!
 People often ask where the line actually ran.
At the foot of this page is a panoramic photo from Bathwick Hill. To the right, the city centre. In the centre ground is Beechen Cliff, an isolated block of limestone with the secluded valley of Lyncombe Vale separating it from Combe Down. The 'Two Tunnels' route was originally a railway that started from Green Park station - next to Sainsburys - and ran to the south coast.
To avoid marking the route with a simple line and breaking up the image, an imaginary 'Train' has set off down the line, tracing the route with a trail of 'Steam'.
The trail starts above the roof of Green Park Station - which can be glimpsed by the start of the steam-trail on the right.
The trail then runs away from the camera to pass close to the gasholders. There it swings left and climbs on a semicircular path through Twerton and Oldfield Park. Approaching the camera, it disappears behind the bulk of Beechen Cliff, and the line tunnels unseen beneath the ridge climbed by the 'Wellsway', surfacing in Lyncombe Vale for a third of a mile or so, while climbing to its summit at Combe Down Tunnel. Hence the last glimpse of the route to the left of Beechen Cliff, with a series of otherwise inexplicable 'Steam wisps' above the trees there - quite close to the city centre once more. For this reason the Two Tunnels route will offer a diverting circular walk within the city!
Select the image for a very large version - 7000 pixels wide - this will open in a new window.
")
Two Tunnels: Made in Bath.